The oil & gas industry routinely uses the American Petroleum Institute’s Recommended Practice 2Z guidelines, commonly referred to as RP2Z, for pre-production material qualification. This qualification typically involves making pipe or plate weldments at the lowest and highest planned heat input for a particular project. Mechanical testing is used to evaluate whether or not the minimum toughness properties of the heat affected zone (HAZ) meet the appropriate requirements. If these requirements are satisfied, then production welding is approved for that base material within the heat input range spanned by the tested weldments.
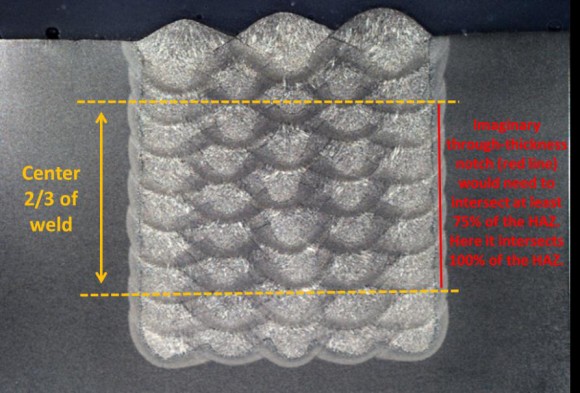
A significant portion of the mechanical testing is crack tip opening displacement (CTOD) testing in the HAZ. To ensure adequate HAZ for testing, RP2Z requires that the sidewall of the weld be straight enough so that a through-thickness notch will intersect the etched HAZ for at least 75% of the notch length over the central 2/3 of the specimen thickness. Figure 1 shows a weld where a notch would intersect 100% of the HAZ over the center 2/3 of a weld.
Figure 1: HAZ straightness criteria
The degree of sidewall straightness varies based on many factors such as bead size, bead placement and sequencing, work angle, interpass temperature, weld schedule waveform, accuracy of part fit-up, etc. So the greatest challenge in conducting RP2Z testing is to diligently manage these variables in order to deposit a multilayer weld that maintains excellent sidewall straightness– not a simple undertaking. EWI has developed expertise and techniques in robotically welding both small and large diameter pipe that achieves consistent sidewall straightness down to 0.25mm of deviation.
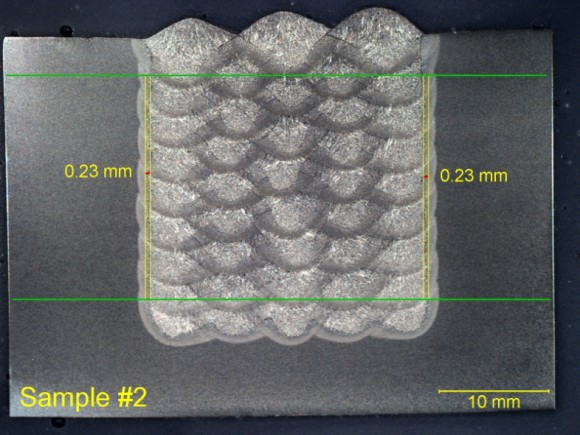
Figure 2 shows a weld cross-section taken form a 9” outer diameter pipe with square groove dimensions of 1” wide by 1” deep. The pulsed gas metal arc welding (GMAW-P) process deposited 42 weld beads at a heat input of 0.6 kJ/mm (15.2 kJ/in). The sidewall straightness deviation over the center 2/3 of the weld was 0.23mm for both sidewalls.
Figure 2: GMAW-P weld cross-section at 0.6 kJ/mm (15.2 kJ/in)
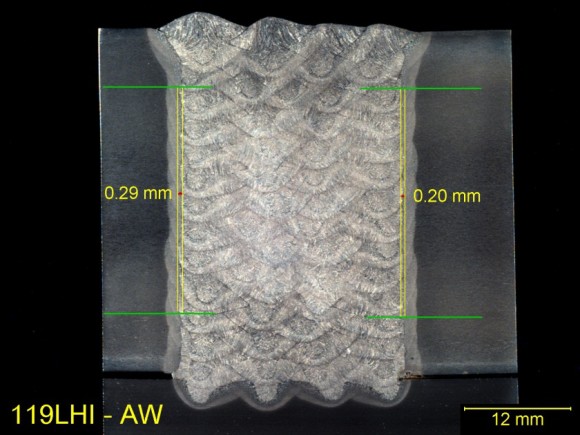
Figure 3 shows a weld cross-section taken from a 36” outer diameter pipe with square groove dimensions of 1” wide by 1.5” deep. The pulsed gas metal arc welding (GMAW-P) process deposited 58 weld beads at a heat input of 0.7 kJ/mm (17.8 kJ/in). The deviation in sidewall straightness of the center 2/3 of the weld was 0.20mm for one side and 0.29mm for the other side.
Figure 3: GMAW-P weld cross-section at 0.7 kJ/mm (17.8 kJ/in)
There are three great reasons why you should consider EWI for your RP2Z testing needs:
1. EWI has developed expertise in achieving excellent sidewall straightness as exhibited in the figures above. This allows for sampling of a greater percentage of the HAZ target microstructure which reduces the chances that the weldment will be rejected based on inadequate sidewall straightness.
2. EWI has developed expertise in welding a double straight wall groove which includes two opportunities to test HAZ toughness in the case that one side does not meet the sidewall straightness criteria. Also, more than one material can be tested using a single girth weld.
3. EWI conducts all welding and mechanical testing elements of RP2Z testing under one roof. This will save you the hassle of scheduling multiple contractors to have the welding and testing completed.
To view a short video made on this topic please open the following link: https://www.youtube.com/watch?v=296C1YMd0eE&list=UUJSOXif4OOBGDi2BZnkTt1Q
For more information, please contact Jason Rausch, Applications Engineer at 614-688-5204 or [email protected].


