In-situ process monitoring has been around for a while in most manufacturing industries – from the trained eye of a supervisor to an automated manufacturing execution system. Additive manufacturing (AM) is no different; it uses sensors to provide both a better understanding of the process and valuable data that can be analyzed to infer the quality of the just-printed component.
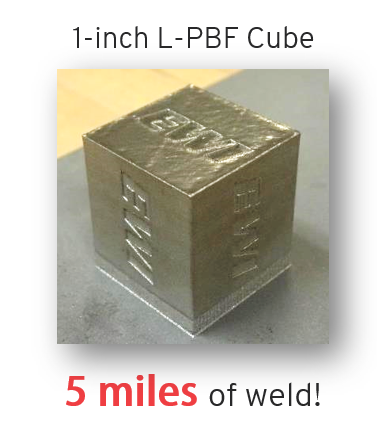
AM processes like laser powder bed fusion (L-PBF) and directed energy deposition (DED) are very similar to welding. At their core, they are repetitive materials joining actions where a final component is built upon successive welds.

Figure 1: LPBF can be viewed as a
highly repetitive welding process.
The number of stochastic process defects that can occur in AM processes like L-PBF are high simply because the same unit welding process is being repeated over thousands of layers, leading to miles and miles of weld material per part! This increases the inspection burden of an AM component, and currently presents a serious bottleneck to qualifying and certifying printed parts.
Based on in-situ data generated during the printing process, just-printed parts can be screened and sorted into categories based on the level of inspection required. For example, there may be some parts that need detailed inspections, and those which are clearly defective and not worth inspecting. Furthermore, regions of interest in the part can be identified based on the in-situ process data and subsequently prioritized during high-resolution CT inspection. At the end of the day, the objective is to reduce the overall inspection burden, and improve yield – saving time, money, and energy.
EWI’s open architecture system (OAS) is a customizable L-PBF test platform which offers complete access to the hardware, optics, and software overlays. As a result, the OAS offers unparalleled control of the path planning variables, optical hardware, motion control digital input for triggering and integration, on and off-axis ports for sensor integration and multiple sensor-mounting ports within the process chamber. Using the OAS, EWI has executed numerous government and commercially funded programs to correlate in-situ process monitoring data with known quality metrics, and demonstrate closed-loop process control.
Having multiple high-fidelity sensors simultaneously recording data is a unique capability that presents multiple challenges. Some key questions are:
- Which sensors really matter for my application and quality objectives?
- What methods and techniques can I use to analyze the data?
- Can I handle all the data being generated?
- How do I combine the various sensor data-streams together?
The short answer is: it depends.
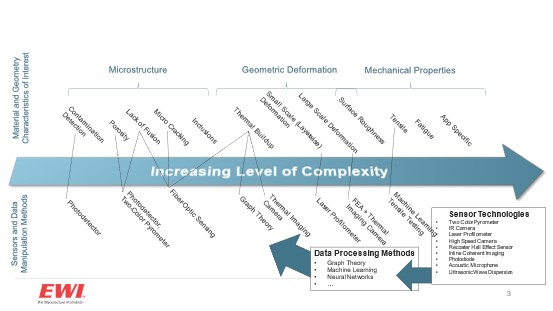
It is important to treat each sensor as a unique lens through which a specific aspect of the process can be understood. So far, a one-size-fits-all sensor does not exist. For example, optical cameras may be great to observe issues with recoating but fall short when information about the thermal history of the part is required. So, it is important to map sensors to the defect types they can detect and rationalize their use within the context of the specific part and the quality requirements. Figure 2 shows how sensors and data processing methods can be linked to detect a specific defect.

EWI is currently collaborating with the University of Nebraska-Lincoln (UNL) to develop techniques to collect, curate, and analyze multiple sensor-streams of data. The first set of builds as part of the recent project involve collecting in-situ data from the following sensors:
- Hall-effect sensor mounted on the recoater drive motor
- Recoater-mounted laser profilometer to monitor out-of-plane distortion
- Stratonics two-color pyrometer for accurate melt-pool temperature readings
- Thermal imaging camera for inter-layer temperature data
EWI and UNL will present additional updates and results from this project at ICAM 2021.