Friction Stir Welding (FSW) is an advanced welding process that uses a third body (often called the “tool” or “pin”) to generate frictional heat between two parts to create a solid-state bond. Originally developed for thin sheet aluminum, the process has now been adapted for a variety of materials from soft metals (aluminum, copper, magnesium, lead) to hard metals (steel, stainless steel, titanium, nickel) to plastics. Another one of my recent blogs can be found here , Friction Stir Welding at EWI, where we discuss the in-roads the technology is making to mass production applications in a number of technology fields. One obstacle to its proliferation, though, is the lack of a reliable method to confirm the weld quality.
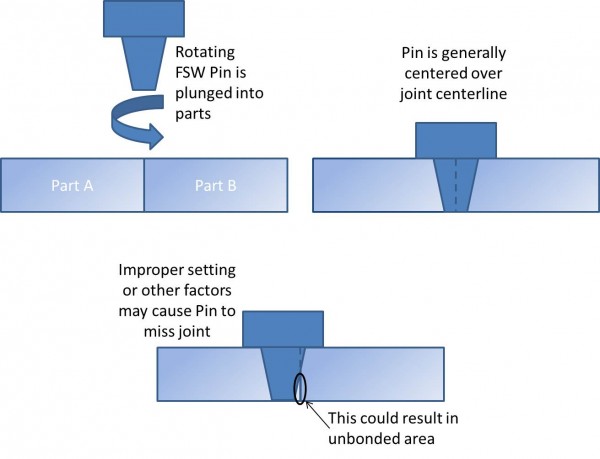
Before talking about challenges with quality confirmation, it may be helpful to read one of Brian Thompson’s recent blogs explaining the basics of the process. His blog can be found here: Interested in Friction Stir Welding?. The simple schematic shown below illustrates the rotating pin prior to plunging into the workpieces (top-left), the pin as it is traversing through the workpieces, centered over the weld joint (top-right), and what can happen if the pin is somehow slightly offset from the weld joint (bottom). Unintentional offsetting of the pin can cause several types of discontinuities or defects including lack of penetration or a displaced bondline were the joint line is basically just moved to one side of the pin without being stirred. In the case where this happens, while there is not full bonding between the parts, there is often sufficient heat and pressure during the operation to develop a “stuck” or “weak” bond, which has basically no strength.

Currently, the best methods for non-destructive evaluation (NDE) of friction stir welds include three different techniques. This leaves the operator the options of ultrasonic inspection (UT), radiographic inspection (RT), and eddy current inspection (ET) to choose from depending on their individual needs. A detailed analysis of the challenges of each of these processes as they relate to common FSW defects and discontinuities is outside of the scope of this blog (though I encourage you to contact myself or Roger Spencer, [email protected], to discuss in more detail). Suffice to say that each of these inspection technologies looks for some change in the properties of the part being inspected to define the level of quality of that part. As an example, the ultrasonic inspection bounces a sound wave down through the part, and judging by the return echo of the sound beam, the operator can determine if the sound traveled all the way through the part (a good weld) or only partially through the part (a bad weld – where the sound bounced back at the interface where the weld should be).
Here comes the issue… The stuck welds as described above, when inspected with one of the traditional technologies, can often be invisible to the inspector, resulting in a poor weld receiving a passing inspection! EWI has done significant research in identifying these types of defects (as well as other common FSW discontinuities). EWI has worked for many years developing phased-array ultrasonic testing (PAUT) on the common joint designs (square-butt, lap, corner, and T-joints) that FSW uses for thinner sections such as those used in shipping building applications to heavy cross-sections used for ground transportation and military applications. Developing these non-destructive test methods has been coupled to the process procedures to determine the reasons behind discontinuity and defect formation. Also, we have further advanced the NDE process using a slight variation of the PAUT called Matrix Phased Array Ultrasonic Testing (MPA-UT). This variation dramatically improve the probability of detection of all of the common FSW discontinuities. MPA-UT uses a series of the conventional ultrasonic elements that are grouped together to function as a unit and can be directed (or steered) at a variety of angles as they pass through the part being inspected. The result is a more complete map of the joint area. This technological advancement is very similar to the improvement from medical ultrasounds just a decade that produces the phenomenal images that are now shown to expentant mothers and fathers.
If you would like to know more about the FSW process, or details about EWI’s work with inspecting FSW components, please feel free to contact me at 614.484.7600or [email protected].
